Esta Parket Installation Instructions
Please read through these instructions carefully before starting to lay the floor.
Rooms in new buildings should be ventilated and heated for at least one month before the parquet installation in order to reduce the moisture level.During and after the fitting of ESTA PARKET the relative humidity (RH) should be kept at approx. 40-60% and the temperature should be between 14-23C (F 57-73º).
ESTA PARKET panels should be laid using the floating floor method. This method is easy to install and can be completed relatively quickly.In almost all cases a moisture barrier must be included in the make up of the floating floor.
The floating floor should be laid on a dry, firm, and level surface.
If surface irregularities exceed 2-3 mm (0.08-0.12”) per 2 metres (78.69″) then a levelling compound should be used.
- Click
- T&G
Although ground level floors in most properties may have a damp proof membrane, or similar moisture preventative measure, incorporated in their construction, it is wise to always use an additional damp proof membrane as parquet must never be laid on a base where moisture is present.
If parquet is to be fixed to a timber surface then the moisture content of the timber must not exceed 8% and 0.5% if fixing to an anhydrite surface [waterproof levelling surface compound].
Before laying the floor, the parquet panels should be stored flat for at least 48 hours in the room where they are to be laid.. It is recommended that before starting to lay the panels, all the packs are opened and boards matched by colour and grain to improve the general appearance of the laid floor.
The following tools are necessary in order to lay ESTA PARKET:
 Laying of the floor should commence by placing the underlay material on top of the damp proof membrane [as necessary] The membrane, such as 0.2 mm (0.08”) polyethylene, should be placed beneath the underlay with a 20 cm (7.87”) overlap at any joints and these should then be taped. The underlay itself must fit flush, not overlapped.
 The first row of floorboards should be laid with the lock tongue facing the wall.
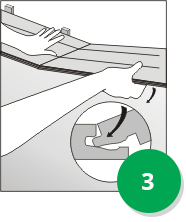 Along the shorter edges the panels should be joined by sliding the profiled (lock) elements of the next board at about a 30º angle. By lowering the board into a horizontal position the lock is engaged. You may use the hammer and block on the panel from the short edge to secure the lock completely.
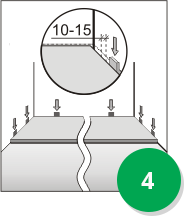 When the first row has been assembled, it should be placed along the wall with 10-15 mm (0.39″ – 0.59″) gaps on the 3 sides, using wooden wedges or waste pieces of the parquet.
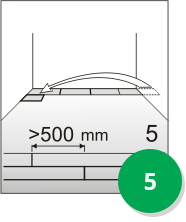 The next row should be started using the length remaining from the previous row provided it is longer than 500,00 mm. If the off-cut is shorter than 500,00 mm (19.69″) – then a new parquet panel should be cut into half and one of the pieces should be used to start the row. Please ensure that short-edge joints are placed at a minimum distance of 50 cm (19.69”) away from each other in adjacent rows.
 There are 2 ways to lay ESTA PARKET. We recommend the method described under 6B.
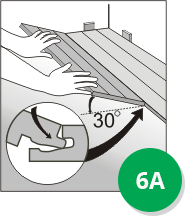 Slightly lift the edge of the parquet panel and insert the tongue into the groove of the previous row and press it together so that there is no gap between them, and then press down to the floor until the boards are locked. You may need to use the hammer and block to fix the panel up tight to the previous row.
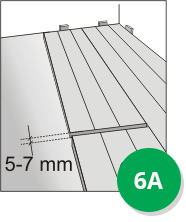 The next board should be placed the same way leaving 5-7 mm (0,20″ – 0,28″) distance between the short edges. Then the short edges need to be locked using the hammer and block and the wooden wedges applied at the end of the completed rows.
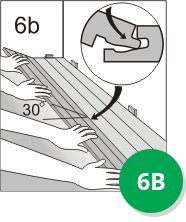 Assemble next row of parquet as described in point 3 above (laying the first row). When this row has been assembled completely allowing for expansion gaps etc as described in method ‘A’, the whole row is inserted into the groove of the 1st row and then pressed down slowly until the lock engages.Using the hammer and block the whole length can be pushed up tight to the previous row.
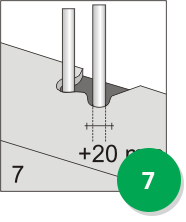 The exercise is then repeated until only one row remains to be fitted. If an obstacles (like pipes) are present, then prior to installation proper cuts should be made on the board.
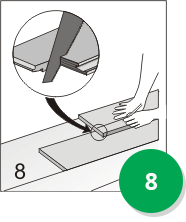 The last row of parquet boards should be measured carefully as it is essential that, as previously described, an expansion gap is left all the way around the perimeter of the laid floor.
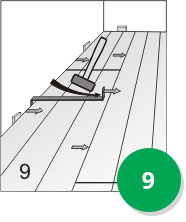 A gap of 10-15 mm (0.39-0.59”) wide should be left and the final row tightly pressed to the penultimate row using wooden wedges or hooks.
 When the flooring has been completely laid, the wedges should be removed. The last task is to conceal the expansion gap and this can be achieved by any number of timber profiles available. The chosen profile should be fixed to the wall and NOT fixed to the ESTA PARKET floor otherwise it would prohibit the natural slight movement inherent in any timber construction.
In laying ESTA PARKET in the recommended way, the area of the flooring should not exceed 80 m² (861.11 ft²) including the 10-15 mm (0.39 – 0.59”) wall gaps unless additional expansion joints are made.
Sound transmission associated with walking on the floor is a normal feature of wooden flooring, similarly variation in colour and grain patterns which are both natural features of wood; do not constitute grounds for complaint.
The parquet must not be laid in unheated and damp rooms (bathrooms, toilets, etc.) or outdoors. Water, sand, and grit are the worst enemies of wooden flooring. We recommend that felt pads are fitted to all items of furniture. Protection may also be necessary if castors are used.
While we take every possible care to ensure each panel of ESTA PARKET is 100% fault free on dispatch from our factory, when the packs are opened, please satisfy yourself before laying the floor that all panels supplied are undamaged. Proceeding to lay the floor with damaged panels will invalidate guarantee claims. Should you have cause for concern then please contact your Supplier BEFORE laying the floor.
This of course does not affect your statutory rights according to the Laws of the Country.
Before and during laying the floor
The building must be weather tight. The heating system must be installed and tested and during the heating season should be in operation. Cast concrete elements, screeding and other wet trades, which contribute moisture to the building, e.g. tiling, plastering and priming of paintwork, must also be completed.
The relative humidity in the building must be between 35 – 65% RH and the temperature approx. 20° C. The residual moisture contained in the concrete must not exceed 90% RH. In wooden based subfloors the moisture content should not exceed 12%.
Unopened packs of parquet should be kept in the room where it will be installed with mentioned above climate before installation for 48 hours. Parquet packaging should be removed only straight before the installation.
NB: Read these laying instructions carefully before laying begins. In case of doubt please contact your ESTA distributor before installing the floor.
Laying by Tongue & Groove Glue System
The sub-floor must be levelled to a tolerance of no more than 2 mm gap showing under a 1.5 m straight edge ( No more than a 3 mm gap showing under a 2 m straight edge). The surface must be smooth with no roughness. Local irregularities, e.g. above day joints, must be levelled.
On concrete and screeded floors use parquet underlayment as an intermediate layer, with lapped joints (remember to use the built-in tape) and turned well up at walls, etc.
On wood based sub-floors Felt is used, alternatively floor felt, 500 g/m2, as an intermediate layer with close fitting joints.
On intermediate layer of flooring grade Polystyrene laid on concrete, a 0.20 mm PE membrane with 200 mm overlay at all joints is placed on the Polystyrene. Please contact your ESTA Dealer for advice.
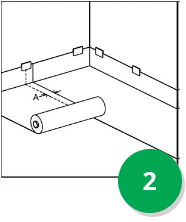
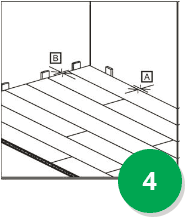
It is recommended that the boards be laid parallel with the longest side of the room in a random joint pattern/staggered. Distribute the header joints as far apart as possible. The distance (A) between board and end joints in two successive rows should be minimum 250 mm (fig 3). Stave end joints in a row of engineered boards should not be in line with stave end joints in the neighboring row, but must be distributed as far apart as possible.
For floors more than 12 m wide and 25 m in length it is necessary to build joints into the floor.
In case of doubt please contact your ESTA distributor before installing the floor.
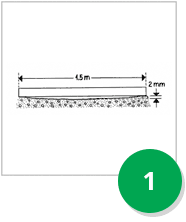
The first row of boards is laid so tongue is pointing away from the wall. Make sure that the row of boards is laid in a straight line. Use temporary spacers or wedges between the wall and the first row of boards to form the expansion gap. Cut the last board to length, use the off cut to start one of the next rows.
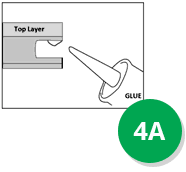 Glue the boards along the entire edges, tap the joints together, using a wooden block. Surplus glue has to be removed immediately by a wet cloth.
Expansion gabs to walls and fixed installations must be 2 mm per linear metre span at both sides (A) and 1 mm per linear metre at both ends (B), however, all with a minimum size of 15 mm.
Cut the last row of boards to form the correct size and apply glue. Use a joint puller to slot the last row of boards into place.

Around pipes, drill a hole in the board to accommodate the pipe. The space around the pipe must have a diameter which is 24 mm (1″) larger than the diameter of the pipe.
A tapered wedge is cut out, so that it can be glued in place.
This gap can be covered by a radiator pipe cover.
At door frames and architraves, cut the base of the frame and architrave to allow the floor to fit underneath.
At the threshold the expansion gap can be covered by a threshold strip.