Инструкция по укладке паркета
Перед началом работ, пожалуйста, обязательно внимательно ознакомьтесь c ИНСТРУКЦИЕЙ ПО УКЛАДКЕ ПАРКЕТА!
В новых строениях помещения должны проветриваться и обогреваться по крайней мере в течение одного месяца до укладки паркета для уменьшения строительной влажности.
Относительная влажность (RH) во время и после укладки должна быть а пределах 40-60% при температуре 14-23°C. Следите за тем, чтобы температура поверхности пола никогда не превышала 27°С, а температура воздуха и помещении всегда была в диапазоне от 14°С до 23°С.
Паркетная доска ESTA PARKET укладывается по принципу «плавающего» пола. Паркетную доску надо укладывать на сухом, прочном и ровном основании. Предварительно необходимо определить (например, с помощью рейки) ровность основания. Если неровности больше, чем 2-3 мм на 2 метра, то основание следует обязательно выровнять. Необходимо также проверить влажность основания. Она не должна превышать 2% для бетонного покрытия, не больше 8% для деревянного покрытия и не больше 0,5%. для ангидридного покрытия.
- Click
- T&G
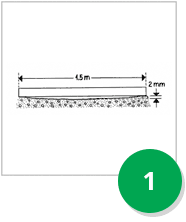
На все полы с бетонным основанием требуется пароизоляция. Рекомендуем использовать полиэтиленувую плёнку толщиной 0.2 мм. Листы плёнки укладывают с перекрытием друг друга внахлёст не менее 200 мм или проклеиваютя лентой.
Рекомендуется использование специальной подложки ESTA PARKET, которая уже имеет встроенную пароизоляцию. Влажность черновых полов с основанием из фанеры или ДСП не должна превышать 9.5%. В таком случае пароизоляция не требуется.
Перед укладкой следует хранить упаковки в горизонтальном положении не менее 48 часов в том помещении, где будет производиться укладка. Перед укладкой паркет следует распаковать и подобрать доски похожие по рисунку и цвету, что наверняка поможет улучшить общий вид уложенного паркета.
Для укладки паркета марки ESTA PARKET необходимы следующие инструменты:
 Укладку начинаем с подложки. Если влажность основания превышает указанные выше нормы, то под подложку из картона или пробкового мата, мы рекомендуем постелить полиэтиленовую плёнку толщиной 0,2 мм. Она укладывается внахлёст 200 мм и скрепляется клейкой лентой. Положка укладывается краями встык.
 Первый ряд досок укладываем короткой частью замка к стене.
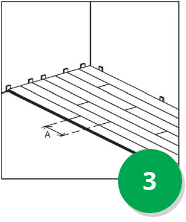
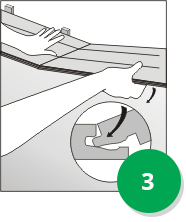 С торца доски соединяем торцевыми замками, вставляя следующую доску под углом около 30°. Опуская доску в горизонтальное положение, защёлкиваем торцевой замок. Для надёжности подбейте доску с торца, чтобы замок полностью защёлкнулся.
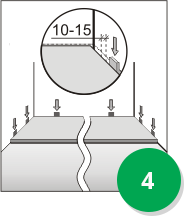 У последней доски ряда отпиливаем лишнюю часть из расчёта, что по длине ряд должен отступать от стенки на 10-15 мм с обеих сторон. После сборки первого ряда паркета, устанавливаем его к стенке с зазорами в 10-15 мм с трёх сторон, используя для этого клинья или обрезки паркета.
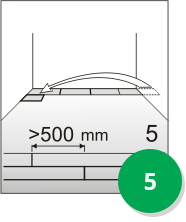 Укладку следующего ряда досок начинаем с фрагмента доски, оставшейся с предыдущего ряда при условии, что её длина больше 50 см. Если этот кусок меньше, то распиливаем пополам целую доску и начинаем укладку нового ряда с половинки доски. Обратите внимание, чтобы в соседних рядах торцевые стыки были не ближе 50 см друг к другу.
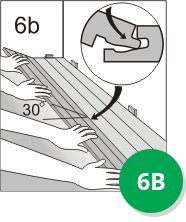
 Для укладки паркетной доски ESTA PARKET существует два способа. Мы советуем укладывать паркетную доску вдвоём, способом, указанным в пункте. 6.Б.
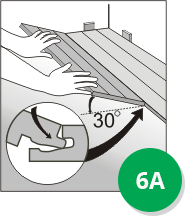 Оставшийся с прошлого ряда фрагмент доски под углом около 30° укладываем короткой частью замка на длинную часть замка уложенного ряда. Прижимаем доску к предыдущему ряду, следя за тем, чтобы в стыке двух рядов не было щели, и медленно опускаем вниз до защёлкивания замка. Легко подбиваем доску при помощи бруска к предыдущему ряду.
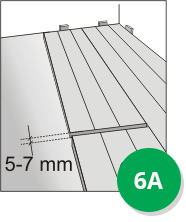 Следующую доску укладываем таким же образом, оставляя 5-7 мм зазора между торцами досок. Используя молоток и брусок, подбиваем доску до защёлкивания торцевого замка.
Далее таким же способом укладываются следующие доски до завершения ряда.
 Начинаем сборку нового ряда паркета так же, как указано в пункте 2 (укладка первого ряда), используя первым оставшийся фрагмент доски. Полностью собранный ряд под углом около 30° укладываем короткой частью замка на длинную часть замка уложенного ряда. Прижимаем весь ряд досок к предыдущему ряду, следя за тем, чтобы в стыке двух рядов не было щели, и медленно опускаем весь ряд вниз до защёлкивания замка. Легко подбиваем доски при помощи бруска к предыдущему ряду.
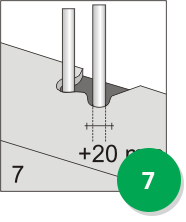 Каждый очередной ряд укладывается таким же способом. В случае препятствий (напр. трубы отопления и т.д., следует отметить на доске фрагмент, вырезать соответствующее отверстие и уложить доску.
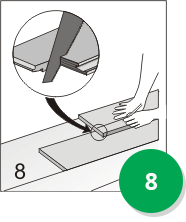 Последний ряд досок перед укладкой следует точно измерить. Если он слишком широк, надо отрезать лишнюю часть доски по длине. Отрезается часть доски с длинной половиной замка.
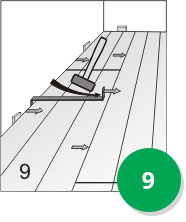 После совмещения последнего ряда с предпоследним рядом, подбиваем ее с помощью монтажного приспособления, чтобы устранить щели между уложенными досками. Вдоль стены должен остаться зазор шириной 10-15 мм. В зазор вставляем клинья.
 После укладки пола вынимаем клинья, а над зазором монтируем плинтус. Нашим полом можно пользоваться сразу после установки плинтусов.
Во время укладки паркета следует помнить о том, чтобы максимальная площадь пола с зазорами у стенок была не больше 80 м² (примерно 10 м по длине доски и 8 м по ширине). При больших площадях следует сделать дополнительные расширительные швы.
Стук, возникающий при ходьбе по паркету, является специфической особенностью деревянного паркета и не является основанием для рекламаций. Различия в цвете и узоре паркетной доски являются естественным свойством натуральной древесины, и не являются причиной для рекламаций.
Паркетную доску нельзя укладывать в неотапливаемых и влажных (ванные, туалетные) помещениях или на открытом воздухе. Самым большим врагом деревянных полов является вода и песок. Для защиты от их действия рекомендуем положить при входе в квартиру или в дом защитные коврики. Ножки мебели, стульев, а также предметы стоящие на полу, рекомендуем подклеить войлоковыми подкладками (ни в коем случае нельзя прибивать подкладки гвоздями).
Паркетная доска должна быть проверена перед монтажом на наличие дефектов. В случае укладки пола из досок с дефектами товар не подлежит рекламации. Доски, на которых обнаружены дефекты перед или во время монтажа, подлежат рекламации. Рекламационные претензии Клиента оформляет торговое представительство (или магазин).
Before and during laying the floor
The building must be weather tight. The heating system must be installed and tested and during the heating season should be in operation. Cast concrete elements, screeding and other wet trades, which contribute moisture to the building, e.g. tiling, plastering and priming of paintwork, must also be completed.
The relative humidity in the building must be between 35 — 65% RH and the temperature approx. 20° C. The residual moisture contained in the concrete must not exceed 90% RH. In wooden based subfloors the moisture content should not exceed 12%.
Unopened packs of parquet should should kept in the room where it will be installed with mentioned above climate before installation for 48 hours. Parquet packaging should be removed only straight before the installation.
NB: Read these laying instructions carefully before laying begins. In case of doubt please contact your ESTA distributor before installing the floor.
Laying by Tongue & Groove Glue System
The sub-floor must be levelled to a tolerance of no more than 2 mm gap showing under a 1.5 m straight edge ( No more than a 3 mm gap showing under a 2 m straight edge). The surface must be smooth with no roughness. Local irregularities, e.g. above day joints, must be levelled.
On concrete and screeded floors use parquet underlayment as an intermediate layer, with lapped joints (remember to use the built-in tape) and turned well up at walls, etc.
On wood based sub-floors Felt is used, alternatively floor felt, 500 g/m2, as an intermediate layer with close fitting joints.
On intermediate layer of flooring grade Polystyrene laid on concrete, a 0.20 mm PE membrane with 200 mm overlay at all joints is placed on the Polystyrene. Please contact your ESTA Dealer for advice.
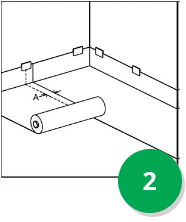
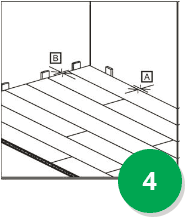
It is recommended that the boards be laid parallel with the longest side of the room in a random joint pattern/staggered. Distribute the header joints as far apart as possible. The distance (A) between board and end joints in two successive rows should be minimum 250 mm (fig 3). Stave end joints in a row of engineered boards should not be in line with stave end joints in the neighbouring row, but must be distributed as far apart as possible.
For floors more than 12 m wide and 25 m in length it is necessary to build joints into the floor.
In case of doubt please contact your ESTA distributor before installing the floor.
The first row of boards is laid so tongue is pointing away from the wall. Make sure that the row of boards is laid in a straight line. Use temporary spacers or wedges between the wall and the first row of boards to form the expansion gap. Cut the last board to length, use the off cut to start one of the next rows.
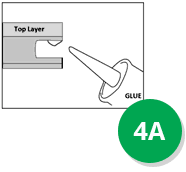 Glue the boards along the entire edges, tap the joints together, using a wooden block. Surplus glue has to be removed immediately by a wet cloth.
Expansion gabs to walls and fixed installations must be 2 mm per linear metre span at both sides (A) and 1 mm per linear metre at both ends (B), however, all with a minimum size of 15 mm.
Cut the last row of boards to form the correct size and apply glue. Use a joint puller to slot the last row of boards into place.

Around pipes, drill a hole in the board to accommodate the pipe. The space around the pipe must have a diameter which is 24 mm (1″) larger than the diameter of the pipe.
A tapered wedge is cut out, so that it can be glued in place.
This gap can be covered by a radiator pipe cover.
At door frames and architraves, cut the base of the frame and architrave to allow the floor to fit underneath.
At the threshold the expansion gap can be covered by a threshold strip.